
Creating a GPT powered Telegram chatbot
1. Create a Telegram bot and get its API token
First, you'll need to create a Telegram account and log in to the Telegram Web version or the Telegram app. /n
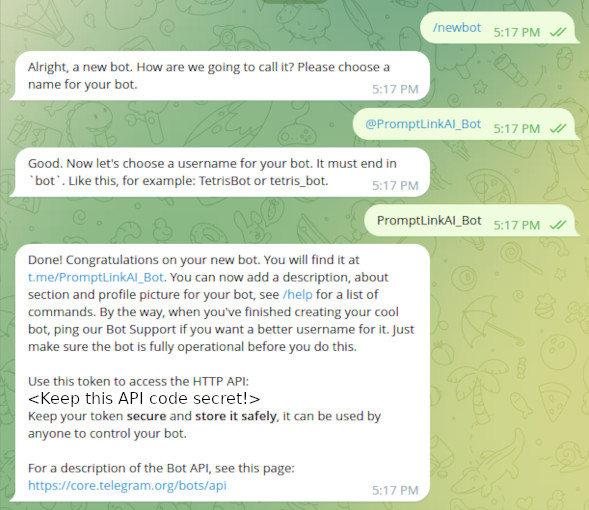
Next, search for the "BotFather" in the Telegram search bar and open the chat.
Type "/newbot" in the chat with BotFather to create a new bot. You will be prompted to give the bot a name and a username. The username should end with "bot". For example, if you want to name your bot "My Bot", the username should be "@MyBot_bot".
Once you've created the bot, BotFather will give you a unique token that you'll need to access the Telegram API. Be sure to copy this token and save it in a safe place.
2. Sign up for OpenAI API
Go to the OpenAI website and sign up for an account if you haven't already: https://openai.com/signup/
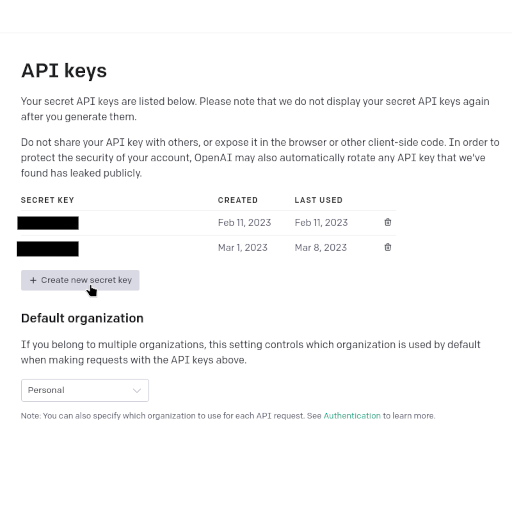
Once you have created an account, log in and go to the dashboard: https://platform.openai.com/account/api-keys
Click on the "API Keys" tab on the left-hand side of the dashboard.
Click the "Create API Key" button and follow the instructions to create a new API key.
Once you have created the API key, copy it to your clipboard and store it in a secure place.
3. Optionally set up virtual environment and Install libraries
The only essential part of this step is installing the libraries. I highly recommend creating a new directory and setting up a Virtual directory (if using an IDE like pycharm this already done for you).
# Create a new directory for the project and navigate to it
mkdir my_gpt_telegram_bot
cd my_gpt_telegram_bot

# Create a virtual environment for the project
python3 -m venv venv

# Activate the virtual environment
source venv/bin/activate

# Install the required libraries
pip install python-dotenv openai python-telegram-bot
4. Create a .env file to store values
You can put these right in your code. However, if plan on uploading to github, server or even just sharing it with your friends, it's important to hide your API tokens. That is why we create a .env. Make a new text file in the same directory as your bot. Name it ".env", make sure it's *not* ".env.txt". put the API values in like this:
OPENAI_TOKEN=<your OpenAI API key>
TELEGRAM_TOKEN=<your Telegram bot API token>
5. Creating our bot file and declaring the values
First, let's create a new Python file and name it gpt_telegram_bot.py. Then, we will import the necessary libraries and set up the constants and configuration values.
dotenv is for loading the APIs from the .env we created.
OPENAI_MODEL declares which model we wish to use, gpt-3.5-turbo is the name for the same model being used in ChatGPT but there are others! check them out!
MAX_TOKENS is a build in parameter for how long you want the output to be, if you go higher you'll have to "forget" more of the previous conversations to stay within the 4,096 hard limit.
MAX_LOG is a parameter we will create later on that will configure how much of the conversation our bot remembers.
#!/usr/bin/env python
# -*- coding: utf-8 -*-

import logging
import os

import openai
from dotenv import load_dotenv
from telegram import Update
from telegram.ext import ApplicationBuilder, ContextTypes, MessageHandler, filters

# Constants and configuration values
OPENAI_MODEL = "gpt-3.5-turbo"
MAX_TOKENS = 128
MAX_LOG = 10  # How many messages will be "Remembered"
6. Configure OpenAI and Telegram APIS
In this function, we use the os library to get the API key and bot token from environment variables. We set the API key using the openai library and raise an error if the bot token is not set.
# Set up OpenAI API key and Telegram bot token
def configure() -> None:
    openai.api_key = os.getenv("OPENAI_TOKEN")
    telegram_token = os.getenv("TELEGRAM_TOKEN")
    if not telegram_token:
        raise ValueError("TELEGRAM_TOKEN environment variable is not set")
7. Respond to User Messages
This section defines an asynchronous function called respond that generates a response to a user message using GPT. It takes in two arguments: update and context, both of which are provided by the telegram library. The function extracts the user's name, chat ID, and message text from the update object, adds the message to a dictionary of messages for the current chat, and retrieves the previous messages for that chat. If there are more messages than configured in MAX_LOG the oldest user and assistant messages are dropped and forgotten.
It then passes this chat history to the OpenAI API to generate a response using the GPT model specified in OPENAI_MODEL. The generated message is extracted and added to the message dictionary for the current chat. Finally, the response message is sent to the user using the telegram library.
async def respond(update: Update, context: ContextTypes.DEFAULT_TYPE) -> None:
    """Generate a response to a user message."""
    name: str = update.message.from_user.first_name
    chat_id: int = update.message.chat_id
    user_message: str = update.message.text

    # Add the message to the list for the current chat, remove old messages
    latest_message = {"role": "user", "content": user_message}
    messages_dict.setdefault(chat_id, []).append(latest_message)
    if len(messages_dict.get(chat_id, [])) >= MAX_LOG:
        messages_dict[chat_id] = messages_dict[chat_id][2:]

    # Retrieve the unique message for the current chat
    unique_messages = messages_dict.get(chat_id, [])
8. Generate the response using GPT
In this section of the code, we use the OpenAI API to generate a response to the user's message. Edit the system, user, and assistant text to tell your bot how to act. Only change the text and not the roles! We call the openai.Completion.create() method and pass in several parameters:
engine: The name of the GPT model to use, which we set as a constant earlier in the code.
prompt: A string that includes the user's message and the previous messages in the chat history.
max_tokens: The maximum number of tokens to generate in the response, which we set as a constant earlier in the code.
temperature: A value that controls the "creativity" of the response. Higher values generate more diverse responses, while lower values generate more predictable responses.
n: The number of responses to generate. We set this to 1 since we only want to generate one response at a time.
stop: A sequence of tokens that tells the model when to stop generating tokens. We set this to None so that the model generates the maximum number of tokens specified by max_tokens.
response = openai.ChatCompletion.create(
        model="gpt-3.5-turbo",
        messages=[
            {"role": "system",
             "content": f"You are a bot designed to answer questions for {name} and share an Amazon affiliate link"},
            {"role": "user", "content": "Where is Paris?"},
            {"role": "assistant", "content": f"Paris is in France {name}."
            {"role": "user", "content": f"{user_message}"}
        ] + unique_messages,
        max_tokens=128,
    )
9. Sending the message
This section of the code extracts the response message from the OpenAI response generated in the previous step. We use the response object and retrieve the first response message using the response["choices"][0]["message"]["content"] syntax. The extracted message is assigned to the response_message variable.
We then create a message object that contains the response message and specifies the role of the bot as "assistant". The message object is stored in the message dictionary for the current chat using the messages_dict.setdefault(chat_id, []).append(response_message_obj) syntax.
Finally, we use the telegram library to send the response message back to the user. We use the await context.bot.send_message(chat_id=chat_id, text=response_message) method, which sends the response message to the chat ID of the user who sent the message.
# Extract the response message from the OpenAI response
    response_message = response["choices"][0]["message"]["content"]
    response_message_obj = {"role": "assistant", "content": response_message}
    messages_dict.setdefault(chat_id, []).append(response_message_obj)

    # Send the response to the user
    await context.bot.send_message(chat_id=chat_id, text=response_message)
10. Adding an error message
In the next tutorial we will add a command menu to allow the user to control the bot. For now let's just add an error message to respond to unexpected events.
async def unknown(update: Update, context: ContextTypes.DEFAULT_TYPE) -> None:
    """Handle unknown commands."""
    await context.bot.send_message(chat_id=update.effective_chat.id, text="Just message normally to use.")
11. Defining the Main Function of the Telegram Bot
This section of the code defines the main function of the Telegram bot. It loads environment variables and configures the OpenAI API key and Telegram bot token. It creates a Telegram bot application using the python-telegram-bot library, adds handlers for commands and messages, and starts the bot using the run_polling() method.
The unknown_handler is used to handle unknown commands and the response_handler is used to respond to user messages using GPT. This function is a crucial part of the Telegram bot, setting up the environment and handling user inputs.
def main() -> None:
    load_environment_variables()
    configure()

    # Create the Telegram bot application
    application = ApplicationBuilder().token(os.getenv("TELEGRAM_TOKEN")).build()

    # Add handlers for commands and messages
    unknown_handler = MessageHandler(filters.COMMAND, unknown)
    response_handler = MessageHandler(filters.ALL, respond)
    application.add_handler(unknown_handler)
    application.add_handler(response_handler)

    # Start the bot
    application.run_polling()


if __name__ == "__main__":
    main()